Tuesday, November 30, 2010

Keep on Truckin'

Things have been rough on a personal level for me lately. Sometimes I feel like everything is falling apart and sometimes I feel like I'm right where I need to be. I don't feel like thinking about or doing anything about or changing or moving past any of the things that are going on because frankly I don't have the time or energy right now. I just need to get through the end of the semester and the urgent pressing issues. I thought I'd share some motivation (for my own good) and also for any of you out there having a down day too.

You've got to get up every morning with determination if you're going to go to bed with satisfaction.
-George Horace Lorimer

Don't be afraid to give your best to what seemingly are small jobs. Every time you conquer one it makes you that much stronger. If you do the little jobs well, the big ones will tend to take care of themselves.
-Dale Carnegie

When you come to the end of your rope, tie a knot and hang on.
-Franklin D. Roosevelt

I may not be there yet, but I'm closer than I was yesterday.
-Unknown

Success is not final, failure is not fatal: it is the courage to continue that counts.
-Winston Churchill

A leader, once convinced that a particular course of action is the right one, must be undaunted when the going gets tough.
-Ronald Reagan

Saturday, November 27, 2010

Christmas Wish List

Now that it is officially Christmas season I thought it would be appropriate to start my Christmas Wish List. This is not all encompassing since many people always have other good ideas and there are probably a handful of things I want but have forgotten about. (I need to remember to write them down more often.) I would be very grateful to get any of the items on this list but frankly I don't expect any of them. Quality time with the special people in my life is way more important than any gift could be but for those of you in the giving spirit...
[1] A Camelback water bottle 25 oz (in purple, blue, forest, or lime) OR a Nalgene Wide-Mouth bottle 32 oz (in slate blue, purple, spring green, or clear) with a Sippy Lid in coordinating color

[2] Vera Bradley All-in-One Wristlet (in most patterns but my favorites are Poppy Fields, Baroque, Loves Me, Paprika, or Carnaby)

[3] Sephora by OPI Winter Mini Collection

[4] Barnes & Noble, Starbucks and/or Jo Ann Fabrics Gift Cards

[5] Philosophy Candy Cane bubble bath and shower gel

[6] Vintage Tees like these from Forever 21 or any other similar ones

[7] Carmex Moisture Plus (in Sheer Peach)


Thankfully everything on this list would be great as a repeat/multiple gift (since I'm horrible about remember who I told what.) A girl can never have too many tops or gift cards or beauty supplies right? I also hope this helps inspire some of your own lists or ideas for special people in your life too.

Happy Gifting!

Tuesday, November 23, 2010

For the Traveling Girl

With the holidays coming up this most likely means travel. And I can bet that if you style your hair with curling irons, straighteners or the like you've been scrambling around with a hot appliance wanting to put in into your bag or suitcase. At least I know I have.
I've been known to set it outside on the porch to help cool it off, to wave it around like a nut case in hopes the wind takes away the heat, or even to carry it in my hand all the way to the ticket counter at the airport because it's just too dang hot to put inside.

Well ladies, problem solved.
Four oven hot plates (from the Dollar Store of course), some extra fabric pieces or ribbon or beads or whatever embellishments you have lying around, a sewing machine and about an hour of your time and Ta-Da....
Simply add whatever you choose to the outside and then sew along the edge between the pad and the edging and you're done. It's easy and doesn't take a lot of skill.
The perfect accessory when traveling. And a great, easy, practical gift idea for girls in your life. I admit I'm keeping one for myself but I'm giving the other three away for Christmas this year. (No names mentioned in case one of them reads this ;-) )
Make sure the hot pads you buy are large enough to be practical to fit most appliances. Some of the ones they sold at the dollar store here were only 7 x 7 which was too small. Luckily it's holiday time so these ones were festive with Santa and Snowmen, but you can't tell unless you look inside. And they were 8 x 10 which was a great size.
Happy Homemade Gifting!

Monday, November 22, 2010

Beautiful Books

After finding this post recently on Living with Lindsay and realizing I have been needing something else to fill the empty wall space above our bed I decided this project was definitely for me! Off to the Dollar Tree I went.

Supplies Needed:
Wreath form ($1)
Cheesy paper back ($1)
Hot glue gun
Lots of glue sticks ($1)
Black Acrylic pain (Optional)
Trashy TV shows recorded on the DVR (Okay I guess that's optional too;-) )

I followed the tutorial here almost to a tee because she does great at explaining the steps so head over there to get more details. (Not that this project is super difficult, I don't want to discourage anyone.) But eventually, with my book page edges painted with black paint, I began tearing out the pages, rolling them up and attaching them to the wreath form.

I would suggest using a foam wreath instead of the kind I used (our dollar store didn't have anything else) because it makes for a more uneven gluing surface which meant I used way more hot glue that I think you might need to with foam. It still worked but it just added a little trouble along the way.
Eventually you get something that looks like this. (This will be the front of the wreath.) You keep rolling and gluing and sticking those pages on in anyway you like and it starts to fill up like this.
A little while later, and with double the needed supplies, you have two awesome wreaths for your bedroom/wherever you want to hang your masterpiece. I used two small brackets I already had to hang them, ribbon will also work if you do it like Lindsay.
Of course I had to get a shot with the pup in it :-) He's just too dang cute. And huge I might add. But I digress.
My wreaths turned out a little more organized/less random/more tightly rolled than the ones Lindsay made (do you think that says anything about my personality) but it just goes to show you that you can make them infinitely yours. I used one whole book per wreath just so you have some idea how much you'll need. So for $4 or $6 I now have some custom art work I'm proud to show off. Who would have thought Doomed Planet would end up being so useful?

Monday, November 8, 2010

Beauty Is In The Eye Of The Beholder

If you haven't heard of Operation Beautiful then please, please PLEASE head over to the site right now and check it out.

The main goal of OB, according to their website, "is to end negative self-talk."

I'm sure all of us at one point or another has stood in front of that mirror... the mirror in the privacy of our own homes, in a bathroom at school or in a restaurant, while standing at a make-up counter, or anywhere else you can think of... and talked down to ourselves either out loud or in our head.

"I want to look better than I do"

"I'll never be as pretty as I want to be"

"I wish I could lose 10 lbs"

"I just want him to think I'm beautiful"

"I hate myself"

What OB is trying to do is prevent the harmful effects that this "negative self talk" can have on the women of our world. They recognize that it's damage can affect you emotionally, spiritually, and physically.

They encourage anyone and everyone to start leaving their signature post-it's that started the whole effort. You post a note in a public place with a kind, thoughtful, inspiring saying on it in order for other women to see it. There is a daily "Post it Phrase" listed on their site if you can't think of something to write down. Caitlin, the editor of OB, encourages you to leave as many notes as you possibly can.

An anonymous note from a stranger can touch so many. It's a free way to change someone's day. So throw a spare pad of post-it's in your bag and start making a difference.

I have.... will you?

Sunday, November 7, 2010

Sock Monkeys

Ashley, one of the girls I watch in the mornings, is turning 5 next weekend. I knew I wanted to get her something but I didn't know what. Clothes are hard since her and her sister often match. Movies are hard because their dad gets tons of them so I don't know which they have already. So I was stuck with getting some sort of toy for her. I took the opportunity, with the help of my sister, to make her something special.

I present you with the "Sock Monkey Tutorial"

Supplies:
One pair of long/over the knee/dress socks of your choosing
Fluff (I had polyfill left over from my pillows)
Two buttons
Scissors
Needle & Thread
Sewing Machine
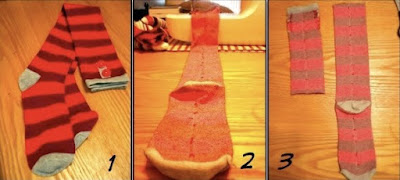
1. Here's the socks I used. She loves the color pink. (I apologize now for the poor picture quality but I swear the socks are pink and magenta striped) I found these for $3 at Walmart.

2. Turn both socks inside out. Lay one with the heal facing up. There is usually a seam/crease the will go down the middle of the sock. Line this fold up on both sides of the sock.

3. The socks I had were "over the knee" socks so they were very long. This specific sock will be the head (toe of sock), torso (from toe to heal) and legs (from heal down) of your monkey. It'll be easier to see this later on. I didn't want the monkeys legs to be way too long so I cut off part of the sock as seen in the picture. I suggest removing the elastic band on any sock you use, even if it's the right length. It just makes it easier.

4. If your sock has the center crease, or even if it doesn't, mark a line from the open end of the sock to the heal. Make sure you stay in the center of the sock. Now sew two parallel lines on each side of this center line. Make sure the lines don't get too close together or cross at any point. There should be at least 1/4 in between the two.

5. Using very sharp scissors cut along the center line. You're essentially separating the monkeys two legs at this point. Make sure to not cut either of the sown lines you've made. Don't cut too close to the heal of the sock. There will be a hole here that you'll stuff through so you want to make sure it's not too small. Once the legs are apart, stitch close the ends of the feet. (not shown)

6. Turn your monkey right-side-out through the hole I mentioned above. Now stuff your monkey's body and legs. Yes, it's sorta awkward that you're stuffing through the money's crotch. (Maybe that's just something I notice. Oops.) It helps to use smaller pieces of stuffing rather than trying to cram in larger pieces. It gives a more overall smooth look as opposed to lumpy. Once your monkey is stuffed to your liking, hand-stitch the hole closed.

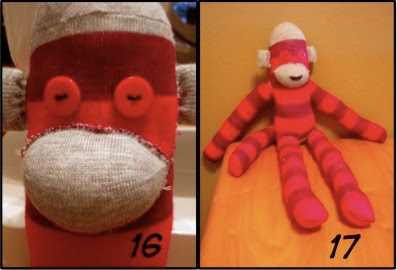
Now you have this awkward monkey in the making. (You can sort of see the lumpy-ness I was talking about in the legs at this point. Just try to smooth it out as you go.) No face, no arms, no tail..... Kinda looks like an alien if you ask me. It'll get better I promise.

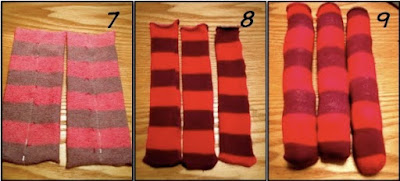
7. Using the other sock and what I cut off from the first sock, I made two similar sized pieces for the arms and tail. (Make sure not to cut too close to the other heal you haven't used. You'll need it later.) Turn the pieces inside out. I decided to pin them both down the center line since they weren't connected at the ends anymore and I wanted to make sure the stripes lined up perfectly.

8. To make the arms, use the same technique as before for making the legs. Draw a center line, sew two parallel lines next to the center, cut between the stitches, and sew the ends closed. I did the same thing for the tail because I wanted all the "appendages" to be the same width around. For the tail you would only use one half of the rectangle when stitching the end closed. Flip all three right-side-out.

9. And stuff. Depending on how stretchy your socks are, you might be able to get more or less stuffing into them than you think. I just compared my arms/tail to the legs I already made to make them the same amount of fullness.
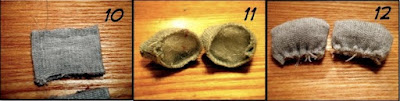
10. To make the monkeys ears I cut two rectangles from the left over material I had. Just don't use the remaining heal piece. I decided to use the top elastic band from the socks that I removed in step #3. I liked that it was gray and wanted to incorporate this into the monkey more. But you can use whatever piece you want. The original rectangles I used were twice as long as those seen in the picture. There is a fold on the right side. Stitch the top and left sides of the rectangle, right sides together.

11. Flip the rectangles right-side-out and stuff with some fluff.

12. Hand sew a long, basting stitch along the open end. Pull tight to close opening.

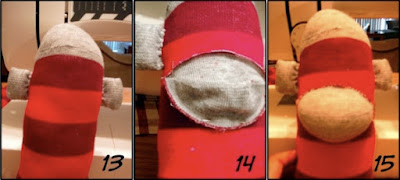
13. Determine were on the monkey you want the ears to be. It's totally up to you at this point. Hand stitch the ears onto the head using any stitch that's easy for you.

14. Remember that other heal I've told you not to touch, this is why. Cut out the other heal from the sock and pin it in place to form the monkey's mouth. Using whatever stitch you want, begin to sew on the mouth. I used a few pins (on the top and bottom) to help hold it in place while I worked. Eventually this piece will be filled with stuffing too so make sure you don't sew it on too flat.

15. Fill the mouth with stuffing when you only have a small section left. Finish closing the mouth onto the face.

16. Choose two buttons for the monkey's eyes. The socks I bought actually had two buttons on each for decoration, how convenient. I used a contrasting thread to make them stand out a little more.

17. You're almost done! Attach the arms and tail to your monkey torso. It helped to pin the two arms on at the same time to make sure they ended up in the same position on both sides. Again, use any hand stitch you're comfortable with, just make sure those limbs are sewn on good. After I was done, I used a scrap piece of black felt to cut out a little smile. I'm not going to lie, I didn't want to sew this part on so I glued it. (Shhh, don't tell the sewing police on me.)

And there you have it,
your own hand-made Sock Monkey!

You can tell in this last picture that the legs are still really long in comparison to the rest of the monkey. I think they make it funny but could you imagine if I hadn't cut off a bunch in the beginning?

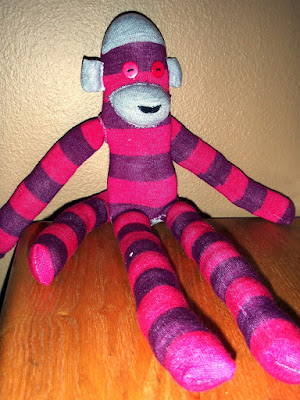
The best part about this project.... it cost me $3 and that's it. I luckily had everything besides the socks. Now she (of course the monkey's a girl, she's pink after all) just needs a little gift bag and she's ready to go.

Hopefully Ava isn't to jealous :-)

Thursday, November 4, 2010

Versatile Blogger

I received my 2nd award today! *happy dance* The awesome/gorgeous/crafty/thrifty/all around awesome Nikki from The Fashionable Wife gave me this award. If you haven't stopped by her blog, please do so.... now!

To accept this award:
1. Thank the person who gave it to you (thankyouthankyouthankyou!
2. Link back to the person who gave you the award
3. Share 7 random things about yourself
4. Pass it along to 7 other blogs you enjoy

There are many, many random things about me.... most are weird, some are embarrassing, but I'll try to pick my favorites :-)

[one] I can't set an alarm/microwave timer/etc for 00, 15, 30, 40 or any even number. (see I told you I'm a freak weird)

[two] It is extremely relaxing to have the bottoms of my feet slapped.

[three] I absolutely LOVE the fact that you can turn the pillow over and it's cold on the other side.

[four] I am terrified of horses... for no specific reason.

[five] I would sometimes prefer to shop in a school supply/organization store (like Staples or The Container Store) than shop for anything else like clothes/shoes/make up etc etc

[six] I could listen to Christmas music all year long and never get tired of it. I purposely leave them on my iPod for the whole year.

[seven] I have claustrophobic feet, they repel socks. I unconsciously take them off and then wonder where they are.

I pass this award to:
Ray @ First Home Makeover
Ashlee @ Embrace the Moment
Syndal @ Synfully Delicious
Tara @ That's Why Her Hair Is So Big
Lindsey @ The Amateur Wife
Tiffany @ The Apply Doesn't Fall Far
Mateya @ The Best Is Yet To Come

Tuesday, November 2, 2010

Do you have an awkward space?


So if you start with some thumb tacks, some pieces of coordinating scrapbook paper, a little hot glue and some time on a Saturday afternoon.... you can make your bathroom all sorts of decorated.

I read about this idea on a handful of blogs, none of which I remember at the moment.
I know, bad blogger. So if it was you/you know who it was, please tell me.


I found a template for some 6 petaled flowers online. I literally googled "flower template" and picked one I liked. The longest part of the project involved tracing and cutting out the flowers from the paper. But when college football is on and you have nothing better to do then it occupies your time quite nicely.

I had 5 different papers so I made sure to lay the flowers out on the bed to get the right shape of the final product and the right ratio of all the papers. (I took a picture of this but my post doesn't want to let me add it in right here.) To give the whole thing more of a 3D effect, I curled the edges of the flowers with a pencil until they were the right amount that I wanted.
I hot glued a thumb tack to the back of each flower, pushed them into the wall above where our toilet is and this is what I got....
A side note about our bathroom situation. The vanity (mirror, sink, and drawers) are all technically IN our bedroom, like with no separation between the two. I know, it's a little awkward. So then we have a door into where the toilet and shower are and that's all that's in there. It's a small space that I didn't really know what to do with and this is the perfect solution. It's a customizable size, I was able to match the colors of our towels, and best of all.... it's cheap and changeable whenever I please. I'm not completely set on the shape of the design at this point, I wanted it to have some what a distinct shape but still be random, but it's really easy to change them around.
I had some extra flowers (actually a lot of extras) so I put a few above our light-switch too. I apologize for the poor picture quality but it's hard to take good pictures in a room with bright over-head lights and no windows for natural light. But none the less, I think you get the gist of the whole project.

I hope everyone's having a good, cool, fall-weather start to November.
It was 90+ in San Diego today. Yuck.

LinkWithin

Related Posts Plugin for WordPress, Blogger...

Labels

101 List 30 days 365 Project anniversary Antigua apartment artist award Baby H Baby H-2 backyard beach bedroom Betty Crocker birth story birthday Blog Sale book of lists books breakfast breastfeeding bride and groom bridesmaids broken Broncos busy cake camera cards celebration ceremony changes Christmas cleaning clothes coffee Colorado conversations cooking country covergirl crafts currently dance Day in the life Dear Monday decorating dessert details DIY dress drink driving engagement Essie etsy exercise fall family flowers food FOTD friends fruit frustrated fun GBU gifts goals graduation groomsmen growing up GTKY hair happy hard work Hawaii hiking holidays holidays. home homeowners honeymoon hope hospice husband and wife Ireland job Lake Powell laughs life life and death life with Mark life with Patrick link-up list LOAP Look what I made love make-up Mark Jameson mark says MCAT med school memory men mom months of Mark months of Patrick motivation moving music My Creations nails Nook numbers nursery Ollie OOTD OPI outdoors paint painting party perfection pho phone photos pictures Piggy Polish Pinterest planning politics pregnancy puppy purse rain random recipes relationships relaxation relieved residency ring Ring Warming sad San Diego school sewing shoes shopping shower sick sketchbook slideshow smile spring spring break stress studying summer surprise swap swim T2T Tail Wagging Tuesday talking tan Target tattoo thankful things I heart tired tradition vacation Valentines video Villa Parker visitors VOTMC weather wedding weekend whole30 winter Wordless Wednesday work work out yoga