Showing posts with label recipes. Show all posts

Tuesday, September 8, 2015

Mark Eats: Sweet Potato Waffles

We are so thankful that Mark is a good eater (at least for now) and are always trying to come up with meals for him that incorporate yummy and healthy ingredients. A lot of the time he eats what we eat which makes things super easy... deconstructing shrimp alfredo into noodles, meat and broccoli, shredding chicken and adding a fruit, breaking up a burger patty with pieces of bun and sweet potato wedges.

But sometimes it comes in handy to have a few quick ideas stashed away for when we need them. My ideal meal for him is obviously something he'll actually eat and we won't have to force feed him, something that has good ingredients with little sugar and something that's quick to prepare at a moments notice. And these waffles hit all the must-haves!


1 1/2 c whole wheat flour
1 c oats
3 t baking powder
1 t cinnamon
1/4 t salt
2 eggs
1 c whole milk
1/2 c plain whole fat greek yogurt
3 T coconut oil
4 oz sweet potato puree (can use any type of puree on hand. apple, pumpkin, peach, etc)
2 T brown sugar

1. Combine all dry ingredients in a large bowl. 
2. Slowly beat in wet ingredients with puree being last. Combine until well mixed. 
3. Heat waffle maker and grease lightly. Use an ice-cream scoop or measuring cup to divide batter. 
4. Cook according to waffle maker instructions. 
5. Serve immediately or place cooled waffles in a ziplock in the freezer for easy access later. 
6. To re-heat, pop into toaster to warm and crisp. 


Thursday, November 14, 2013

The Case of the Green Drinks

Inspired by a med-school friend of mine, I've been getting in on the green-smoothie trend and actually really enjoying it. The first one I made was not very good, I admit. But after a few different rounds, adjusting the ingredients to my likings and acquiring my taste buds I've found what works for me and am loving the idea of getting in so many servings of fruits and vegetables before the day's even half over!
The Green Drink
Consistent Ingredients
  • 2 cups baby spinach
  • 1/2 to 1 cup baby kale
  • 1/4 to 1/2 medium sized cucumber, pealed and cubed
  • 1 to 2 T ground chia seeds
  • 1 medium size apple, cubed
  • ~1/2 cup water, to desired consistency
Variable Ingredients
  • 1 medium sized banana, sliced
  • 1 medium sized pear, cubed
  • 1 cup frozen or fresh berries
  • 1 cup pineapple, cubed
  • Other dark greens like chard, etc
  • Fresh ginger, parsley or cilantro to taste


The best thing about these smoothies is the variability of what to include based on the seasonal fruits. When I first started making these, summer berries were just at their end so my first few had strawberries/blueberries galore. Now that it's fall and the pears are heavenly, they've been making an appearance almost every day. 

My only suggestion is to blend the water and "greens" alone in the blender until really smooth. My first attempt ended up being chunky due to the fact that I just threw it all together at once. After the greens are blended feel free to add in anything and everything that you enjoy. The flavor combinations are endless. I typically make mine the night before, store it in an empty jar and place it in the fridge over night. This makes it super cold for when I enjoy it for breakfast but using frozen fruit or even ice cubes instead of water will have the same effect if you make one to drink right away. 

I also guarantee that if you have a silly vegetarian pup like I do that this will consistently be the scene when you turn around from chopping fruits and veggies on the counter. Sometimes I indulge him with his own mini-smoothie in his belly with bites of my produce. 
These drinks might appear gross (as I've had J and classmates comment that they look like pesto, algae and pond water) but I assure you that they are quite delicious. Plus, they're packed full of nutrients and help you right along your way to the recommended 4 1/2 cups of fruits and veggies each day!

Have you every tried green smoothies? 
What's your secret ingredient if you have?

Wednesday, October 30, 2013

Fall Sangria

It's no secret that I'm a big fan of Sangria so when it was decided that my med school friends and I were going to have an early Halloween party this past weekend I knew I wanted to create a delicious beverage for us to enjoy as we let off some steam. 

While the summer Sangria was a huge hit, the fruit for it isn't in season anymore so I needed to change things up. Enter this Fall Honeycrisp Sangria!
It would have been wonderful for me to have taken a picture of the final product but that was just asking too much. I'm just happy I was able to pull something tasty together as well as a DIY costume after a morning full of exams. Trust me when I say the drink looks very festive with all the fruit as the final product.
______________________________________________________________________________

Honeycrisp Apple Sangria
Recipe from here (with a few changes)
Prep Time: 15 min || Cook Time: 4 hours (or overnight)

  • 5 honeycrips apples, cored and cubed
  • 1 orange, quartered 
  • 2 lemons, sliced into rounds
  • 1 lime, sliced into rounds
  • 2 cinnamon sticks
  • 1/3 cup orange blossom honey
  • a pinch of ground nutmeg & ginger
  • 1 cup peach schnapps
  • 2 750 ml bottles of Chardonnay 
  • 2 L club soda
  • Ice
Cut up fruit and place in large container with wine, peach schnapps, honey, spices and cinnamon sticks. Stir and refrigerate overnight or for at least 4 hours. Add in club soda right before you're ready to start drinking. Serve in sugar rimmed glasses over ice. 
______________________________________________________________________________

In keeping with my drink of choice, it seems like I'm going to have to find a winter Sangria for the holidays now. I'm thinking something with cranberries and pomegranate? Maybe using champagne to give it a bit of bubbly? 

Friday, March 1, 2013

Sausage Wonton Appetizer

These things are seriously delicious for your lunches all week a party! They take simple ingredients and are super easy to whip up. Plus, aren't the cute!?

My mom first made these while I was in high school and if there's ever an opportunity where she asks my opinion about what to make, these are always the first thing I suggest. We always have them on Christmas Eve, we've taken them to many friends' houses and she even made them for my Bridal Shower last summer.


Sausage Wonton Cups
Prep time: 15 minutes
Cook time: 20 minutes

Ingredients
3/4 lb Italian Sausage
1/2 c Salsa
1/2 c Monterey Jack Cheese
1 c Sharp Cheddar Cheese
2 oz Diced Green Chilies
24 Wonton Skins
Olive Oil
Garnish: sour cream & chopped green onions

[1] Brown sausage over medium-high heat until cooked. Remove from pan and place on bowl lined with paper towels to remove excess grease. 
[2] Return sausage to pan. Add salsa, cheese and chilies.
[3] Mix until cheese is all melted and mixture thickens. Remove from heat and cool slightly. 
[4] Heat oven to 350 degrees. Brush mini-muffin pan with oil. 
[5] Press one wonton wrapper into each cup and fill with 1 generous tablespoon of meat mixture.
[6] Bake until edges are browned. Approximately 10 minutes.
[7] Carefully transfer to baking sheet and bake until bottoms are crisp. Approximately 10 minutes. 
[8] Garnish with sour cream & onion if desired. Serve hot.

*Meat mixture can be prepared 4 hours in advance if kept covered and chilled*

Enjoy!

Saturday, January 26, 2013

Pretzel M&M Oatmeal Cookies

I thought I would take a break from wedding recap posts for the weekend and instead introduce you to one of my new all-time favorite cookie recipes! 

Pretzel M&M Oatmeal Cookies

These cookies are seriously to die for! The sweet-salty combo is one of my favorites right now and when combined with a chewy oatmeal cookie, it's like heaven in a bite. Seriously. I told myself I was going to bake these and then take half into work so that I wasn't as tempted. Let's just say the whole tupperware is still on our kitchen counter. Oops!

Oh and I forgot to mention one minor detail. Look at this beauty J and I got as a wedding present! It was on my registry for my bridal shower as my "one expensive item" and I didn't end up getting it. Well the two lovely ladies that threw my shower for me decided to go in together and get the mixer for us for the wedding a few months later! I absolutely love it! (especially since it matches my red toaster!)


Alright, alright, back to the cookies! The original recipe is from here.

Ingredients
3/4 c. unsalted butter
1/4 c. cream cheese
1 egg
1/2 c. sugar
1/2 c. dark brown sugar
1 1/2 t. baking soda
1/4 t. salt
1 1/4 c. flour
1 1/2 c. quick cook oats
1 large (9.9 oz) bag Pretzel M&Ms


- Melt butter in small saucepan and heat until browned and nutty. Set aside to cool slightly.
- Place cream cheese, egg, sugar, dark brown sugar, baking soda and salt in mixer and mix on medium until combined. (1-2 min) Add butter and mix to combine.
- Smash M&Ms in ziplock bag using rolling pin until coarsely broken. Combine flour, oats and candies in bowl. Fold into wet mixture from above using sturdy spoon.
- Place tablespoons of cookie dough on baking sheet lined with parchment paper. Flatten cookies slightly with fingers. Bake at 350 for 10-12 until bottoms are golden brown.


Let cool on rack for as long as your stomach will allow. Serve with milk and EAT!


Now that I've officially become obsessed with these cookies I've already started thinking what other candies I could substitute for the Pretzel M&Ms to make another variety. Peanut M&Ms? Something with caramel? The options are endless. 

Happy Saturday and happy baking everyone!

Thursday, October 25, 2012

Currently [v3]

Basically this is a post for a few things that didn't deserve their own post but I had to share them with you anyways. I am currently loving.... 

>>> Starbucks Iced Americanos. I don't know why I never ordered one before but ever since, I just can't seem to get anything else. And since it doesn't quite feel like fall around these parts in sunny San Diego, I can go for something iced still. But believe me, when those red cups come out I'll sure be making a switch.


>>> OPI Wooden Shoe Like To Know It. I think it's the perfect fall color without being overly dark. It's a brownish purple with a little sparkle to it and the formula is fantastic. Two coats gets great coverage and they haven't chipped yet which is awesome for my nail-polish-hating nails.


>>> These amazing apple crisps. I made my first batch the other afternoon using a single apple. But silly me, who was I kidding. I gobbled them up that same night and had to make a larger batch again the next day. They're super simple and bake for long enough to make your house smell like apple pie without all the effort.

>>> TheKnotDOTcom. Seriously it's been my best friend since getting engaged and I'm constantly finding new tools and ideas and endless amounts of inspiration from that site. I highly recommend any bride-to-be to check out all that it has to offer. For example, my most recent use has been related to our guest list. I made an excel file with everyone invited, imported it to the website and have been able to track our online-RSVPs as well as easily create seating plans with an interactive screen to show table placements and such. It's been awesome for this DIY/OCD bride like me.

So tell me, what are you loving this month? Anything you think I'd love too?

Wednesday, September 5, 2012

Smells Delicious: Pesto


Pesto is one of those things that to experience it is to smell it. On your fingers after you make it. In the air of your kitchen as it combines with something warm for diner. As you eat it.
 And oh, the ease of growing basil. It's hardy, it's full, it's delicious. 
 It's symmetric, it's aromatic. It smells so heavenly I can't keep from rubbing it between my fingers. 
 And it must be good, someone's been eating it in my backyard. Not to mention the few leaves Ollie's gobbled.
Recipe modified from here and eaten up with yesterday's dinner. Complete with Italian breaded chicken and whole wheat pasta. 
I think we'll make this again soon. 

Thursday, July 12, 2012

15 Day Challenge [Day 7]


[Day 7] Recommend a book. Why do you think it's important?


It's been quite some time since I've read this book but it is one of my favorites.

The story is set in Mexico at the beginning of the century during the Mexican Revolution. Tita, the main character, is the yongest daughter in her family and because of that it is her duty to remain by her mother's side for her entire life. She is not allowed to wed and start her own family and yet she falls in love dispite her destiny. Tita uses her emotions, her heartbreak and her anger and her love, in her cooking and causes those around her to experience what she is going through.

"Something strange was going on. Tita remembered that Nacha had always said that when people argue while preparing tamales, the tamales won’t get cooked. They can be heated day after day and still stay raw, because the tamales are angry. In a case like that, you have to sing to them, which makes them happy, then they’ll cook."


The book has 12 chapters, one for each month of the year, and each begins with an authentic Mexican recipe. I loved the classic story-telling in this book and might actually dig out my copy again this summer to re-read it. 

Thursday, May 3, 2012

Strawberry Jam

On Monday night I tried my hand at making homemade jam for the first time. I found the recipe in one of the spring editions of Bon Appetit that my mom gave me the last time J and I went home. I had read it on the plane and knew I wanted to try it.


The recipe is seriously so easy! (to get the full details, click on the source link for the top picture to be taken to the Bon Apetit site.) Basically you quarter some strawberries and throw them in a pot with suger and a grated granny smith apple.


You bring the pot to Medium-Low heat stiring so the sugar doesn't burn until it starts to melt.

I cheated and used a potato masher to squish everything up but the strawberries eventually get soft enough that you can just use a spoon if you'd like.

Bring the mixture to a simmer and allow to reduce for about 10-15 minutes. I don't think I waited quite long enough but since it was my first time I errored on the side of caution. I didn't want to ruin it! Here it is coming together quite nicely, starting to look like real jam!

Once it's done you transfer it to a jar or bowl, thankfully I saved an old spaghetti sauce jar that worked perfectly for the amount that I made. You let it sit for a little while and once it's cool enough to handle you cover it and put it in the fridge.


*Please excuse the crappy cell phone pictures. As luck would have it, right as I put the pot on the stove and took a picture of Ollie eating a straberry, my camera battery died. And I couldn't exactly wait for it to charge since the stove was cookin!*


I tried the jam the next morning and it was absolutely delicious. J tried a bite of it and said "that tastes like the real stuff! It's bomb [dot] com!" I can't wait to let other people try it and to possibly try different variations of it. I'm thinking a mixed berry might be amazing. Strawberries, raspberries, blackberries maybe? Or an orange mango possibly? The options are endless.

So tell me friends, have you tried something new in the kitchen lately? 

Tuesday, March 13, 2012

Spicy Shrimp Recipe

J and I have been trying to make new and interesting things for dinners lately because we kind of got in a funk when it came to meals for a little while. It seemed like we were always making the same things over and over again so each week we've been trying to make at least two nights into a trial nights for something new and fresh and not the typical. 

We've found a good one, let me tell you! And the fact that we made this recipe twice in the same week definitely says "success" to me.

Spicy Shrimp from The Pioneer Woman


Ingredients
  • 3 lbs unpeeled shrimp (21-26 count or larger)
  • 1/2 c olive oil
  • salt and pepper
  • 3 whole lemons
  • 1/4 c Worcestershire sauce
  • Tobasco
  • 1 stick butter
This recipe is right up our alley. 

I made a few changes but stuck to the recipe for the most part and her instructions and pictures are awesome so I won't go into detail about that. We only made 2 lbs of shrimp (which is definitely a lot for two people) so I adjusted the other ingredients down a little bit as well. We only used shrimp that were the 31-36 size and they turned out just fine. I think I used more Tobasco that typical since J and I luuuvvv spicy and I only used about a quarter of a stick of butter. The Paula Dean in me just couldn't push me into putting that much butter on it and we enjoyed it 100% even without it. I served it up with crusty french bread just like I was told to and it was absolutely delicious! 


This recipe's going in the arsenal to be made again and again!


Thursday, February 9, 2012

Boston Cream Pie Cupcakes

This past Sunday was my 23rd birthday. 
I can't believe it's already almost the middle of February because I'm still wondering where 2011 went if we're being honest here. 

When J and I were talking about plans for the birthday weekend festivities he asked me if I'd like a regular cake, cupcakes or an ice cream cake. And while I would really love all of the above because I'm a huge dessert fan I actually opted out for none. You're in complete shock now, right?  

Instead of buying a delicious treat I wanted to try a new recipe, something from my Sweet Treats board on Pinterest and these are what I picked.


They were incredibly simple to make and I whipped them up during the Super Bowl on Sunday afternoon. I actually worked on them when the actual game was on because honestly, I didn't care much about who won the game. I was more interested in the commercials and half-time show. Here's how mine turned out....


I made one batch of mini cupcake size and the rest as regular size. If I were to do it again I would make them all mini because they were the perfect bite-size snack to curb that sweet tooth. They are so rich, so delicious and pretty filling. To keep J and myself from eating every single one of them I brought a big tupperware full of them to work on Monday and they were a huge hit. The empty tupperware came home with me the next day! 

I chalk this recipe up as a success! I will definitely be making them again and I suggest you consider doing the same if you're in need, whether socially or personally, ;-) of a little something sweet. 

Sunday, December 11, 2011

Grandma Shangraw's Lasagna

It's been quite a while since I've shared a recipe with you and trust me, this is one you'll definitely want to know. J and I both love anything Italian when it comes to food so this is definitely up our alley. I present to you...

Grandma Shangraw's Lasagna
(and grandma Shangraw isn't even my relative!) 


 The List of Players:
8 oz cream cheese
8 oz ricotta cheese
8 oz grated romano cheese
Large bag of mozzarella 
3 eggs
No-boil lasagna noodles
1 lb ground beef (not pictured)
1 lb italian sausage (not pictured)
Small can tomato paste
Small can tomato sauce
Large can Tomato Puree
Lawry's spaghetti sauce mix
1 t salt
1/4 t pepper
1 t oregano
Several shakes parsley 

1. Brown ground beef and italian sausage together in large pan until no longer pink. Drain. 
2. Mix together tomato sauce, puree and paste with Lawry's spaghetti sauce mix in large bowl. Set aside
3. Beat eggs and add all seasonings in medium bowl. 
4. Add cream cheese to egg mixture. (I find it easier to slightly mash up the cream cheese block and then put it in the microwave for about 15-30 seconds to make it easier to mix) Stir in ricotta cheese followed by romano. 


5. Coat bottom of 9 x 11 in baking dish with a layer of sauce. (After this point you can leave the meat separate from the sauce or if you want you can mix them together. I don't have a big enough bowl for this so I leave them separate.) 
6. Layer noodles on top of sauce. (I always squeeze in 4 noodles on the bottom layer only and then use 3 for each of the other layers)
7. Place cheese mixture over noodles. 
8. Place meat over cheese. Layer one is complete. (Just as a heads up for portioning, I typically get three layers in my pan)


9. Continue in the same process as before making your layers. Sauce, noodles, cheese, meat. You want to END with the sauce layer though so beware. 
10. Admire your gooey layers!
11. Cover entire top with mozzarella cheese. (I never end up using the whole bag but you want to make sure it's al covered)
12. Prepare some garlic bread or salad to go with it and pop the pan in a 350 degree oven for 45 min to 1 hour

Now just a word to the wise, once your lasagna is put together and all ready to go in the oven it can be stored in the fridge for a few hours if you feel like putting it together in the morning OR it can be frozen and used on a completely different day. Theoretically if you had two baking dishes you could even double the recipe, make one for dinner that night and then save the other for the following week. I've never had the patience to wait to cook ours though, it always looks and smells too good :-)


Remove from the oven once top is golden brown. (Ours got cooked a little too much last night so you'll want yours a little lighter than the picture above but I personally liked the crunchy top this time. Your preference) Pair with some of your gooey garlic bread and a glass of red wine and wait for the compliments to come in! J always raves about this meal and the best part is there's usually lots of leftovers! 

Bon Appetit!

Wednesday, July 13, 2011

Pinterest + Food = Love

If you haven't jumped on the Pinterest wagon I highly suggest you do. And follow me while you're at it... jaymeeryn. It's a great place to find inspiration for your house, fashion, travel, photography, DIY/crafts, and much much more.

But one of my fullest "Boards" has to do with one thing we are obsessed with around here and I seem to constantly be mentioning...


Pinterest allows you to see pictures of amazing food and then what's even better, it provides you with a link to where that gorgeous picture came from. And a lot of the time that link will also take you to a recipe. Well J and I have tried three new recipes all found on Pinterest and I thought I'd share the links so you can get inspired in the kitchen as well.

(The following pictures include the one I pinned on top and one I took of our attempt on the bottom.)

With it being summer the thought of turning on the oven to bake seems like crazy-talk around here so these bad boys have hit the spot for dessert lately. They were easy to make, required only a few ingredients and when placed in the freezer have been absolutely delicious and cool on these warm summer nights.

Rebecca, the author of the blog where this recipe is from, calls Taco Soup trashy and Frito worthy.... a perfect combination around this house. It's spicy and hearty and full of simple ingredients you might already have in the pantry. It was absolutely a breeze to make and we're gong to have left-overs for days with this meal.

These goodness-in-a-tube treats are probably going to be made many times in the coming weeks because they have turned into our top mexican meal because they were so delicious. They're crunchy, flavorful, and easy to make. We used some shredded chicken we had frozen in the fridge and all other ingredients we already had. They were great for a full dinner meal served with some tortilla chips but they'd also be good as appetizers for a party.

I have many more pins related to food that I hope to show you once we make them but for now I'm very happy with this start.
Happy pinning!

Saturday, June 18, 2011

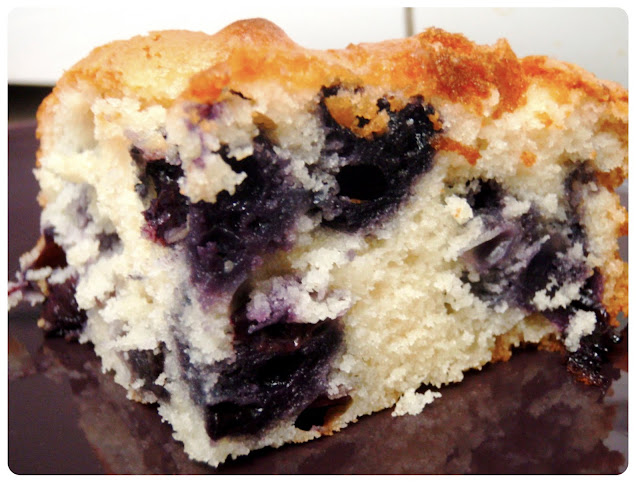
Blueberry Picnic Cake

I'm here again with another fabulous and summery baked good. There seems to be an endless schedule of BBQs, pool parties and beach days this time of year and this treat would surely please everyone who tastes it. Plus, berries are in season right now and it's hard to pass up a good deal at the grocery store.

This ladies and gents is the
Blueberry Picnic Cake

Recipe:
(for 13 x 9in pan)
4 eggs
2 cups + 2 tablespoons sugar
1 cup unsalted butter, softened
1/2 teaspoon salt
2 teaspoons vanilla
3 cups flour
2 teaspoons baking powder
2/3 cup milk
2 pints fresh blueberries, washed and dried
(recipe can be cut in half for 8 x 8in pan)


To prepare, heat oven to 350 degrees and grease pan. Wash blueberries and allow to dry. Separate egg whites from yolks.


Beat egg whites until stiff in medium sized bowl. Gradually add 1/2 cup sugar until blended. Keep this mixture separate until needed in later step.


In separate large bowl cream butter until fluffy. Add salt and vanilla. Gradually add 1 and 1/2 cups sugar. Add egg yolks and beat until light and creamy. Add 2 and 1/2 cups flour, baking powder and milk. Fold in beaten egg whites from before.


Toss clean blueberries in 1/2 cup flour to coat completely. (This keeps them from all falling to the bottom of the pan when cooking.) Fold berries into batter and pour into pan. Sprinkle 2 tablespoons sugar on top of batter.

Bake 50-60 minutes until cake pulls away from sides.
Allow to cool, cut and enjoy!

I cut the recipe in half when I was making it but the instructions are for the full recipe. For example, I only added 1/4 cup sugar to the egg whites where the directions say 1/2 cup. (I hope that didn't confuse anyone, sorry.) Also, I had to show you my fabulous hand mixer that I use for all my baking because frankly, I think the retractable chord is the coolest thing ever! If I can't have one of these big mixers then I'll settle for the cool chord of this one. The only bad thing is that it freaks Ollie out when I use it, oops.


Are you baking anything with the seasons berries yet?

LinkWithin

Related Posts Plugin for WordPress, Blogger...

Labels

101 List 30 days 365 Project anniversary Antigua apartment artist award Baby H Baby H-2 backyard beach bedroom Betty Crocker birth story birthday Blog Sale book of lists books breakfast breastfeeding bride and groom bridesmaids broken Broncos busy cake camera cards celebration ceremony changes Christmas cleaning clothes coffee Colorado conversations cooking country covergirl crafts currently dance Day in the life Dear Monday decorating dessert details DIY dress drink driving engagement Essie etsy exercise fall family flowers food FOTD friends fruit frustrated fun GBU gifts goals graduation groomsmen growing up GTKY hair happy hard work Hawaii hiking holidays holidays. home homeowners honeymoon hope hospice husband and wife Ireland job Lake Powell laughs life life and death life with Mark life with Patrick link-up list LOAP Look what I made love make-up Mark Jameson mark says MCAT med school memory men mom months of Mark months of Patrick motivation moving music My Creations nails Nook numbers nursery Ollie OOTD OPI outdoors paint painting party perfection pho phone photos pictures Piggy Polish Pinterest planning politics pregnancy puppy purse rain random recipes relationships relaxation relieved residency ring Ring Warming sad San Diego school sewing shoes shopping shower sick sketchbook slideshow smile spring spring break stress studying summer surprise swap swim T2T Tail Wagging Tuesday talking tan Target tattoo thankful things I heart tired tradition vacation Valentines video Villa Parker visitors VOTMC weather wedding weekend whole30 winter Wordless Wednesday work work out yoga